This post may include affiliate links, which means I may make a commission on purchases made through these links at no additional cost to you.
As regular readers know, I'm a huge fan of 'doing it myself' whenever I can. If you've been here a long time, you may even remember that I did virtually everything for our wedding, even the reception and the cake!
Not knowing how to do something doesn't necessarily stop me - I'm happy to learn new skills. This does not mean I am intent on doing and making absolutely everything in my life for myself. Sometimes a project is truly beyond the scope of what I can, or am willing to, do. Other times I'm just not interested or realize that the DIY version would be unsatisfying or overly expensive.
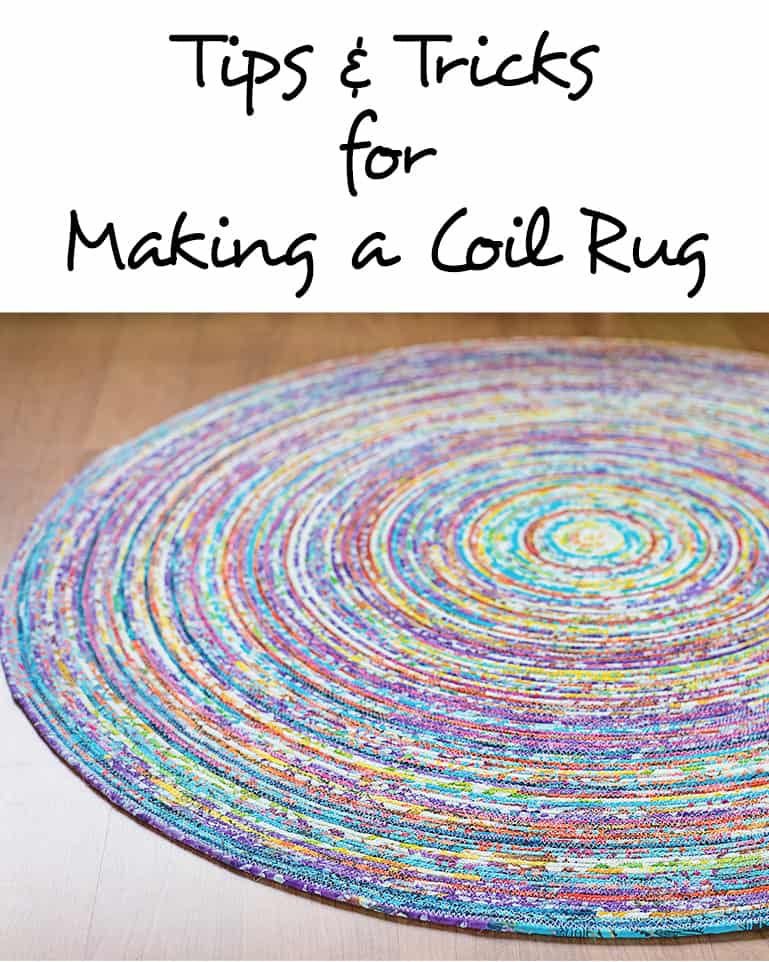
Over the years I've developed a mental checklist I go over when I'm deciding whether to buy or DIY. Since we've been making a lot of things for Baby lately, this questionnaire is fresh in my mind and I decided to share it with y'all! Then, in the second half of the post, I share a fabric coil rug tutorial I decided to make after stepping myself through the buy or DIY mental process. I hope you enjoy!

Tips for deciding whether to buy or DIY
Do I have at the skills and/or knowledge necessary to compete this project?
- If not, do I have the interest, time, and ability to learn what I need?
Do I have the tools, space, and materials necessary?
- If not, is it reasonable to purchase, find, or borrow them?
Do I find the idea of making this particular item/undertaking this project interesting or exciting?
- If not, I tend to buy instead of DIY simply because I don't actually want to make the item (unless there is some other huge advantage). For example, I hate sewing with knits and will usually skip even simple projects if they require a knit fabric.
Can I reasonably expect to be satisfied with my DIY result?
- Sometimes you don't know until you're part way through a project whether or not it will turn out, but sometimes plans are clearly so cobbled together that the result would be clearly amateurish. If you're okay with that, great, but if you suspect you wouldn't be happy with the end result, just buy.
I also ask myself several more subjective questions. Although your responses may influence your decision whether to buy or DIY, as long as you have (or are willing to acquire) the knowledge and materials needed for a project and want to complete it yourself, you can absolutely go ahead with the DIY option, even if you answers to some of the subjective questions are a little less cut and dry.
Will it be cost effective for me to DIY this project?
- If you have to purchase additional materials or specialized tools, particularly ones you may not really use again, buying may be more cost effective than DIYing. Sometimes the DIY option is more expensive, but still more personally desirable for other reasons.
Particularly when the DIY option won't be less expensive, ask yourself:
What different or unique thing can I bring to this project or item? Is there an equivalent available, or do I need something very specific?
- Living in Hawaii means getting exactly what I want can be difficult. I can also be sort of picky once I've made up my mind! Even if a DIY version theoretically costs more, it can still be totally worth it if none of the available options are quite what you want or if the shipping cost/nuisance necessary to acquire the item (such as a long trip to a speciality store) is high.
How attached am I to making this item/doing this project myself and why?
- Sometimes makers gotta make! Even if you could totally buy something very similar and making it yourself will cost more, you might just want to DIY it for the personal satisfaction of knowing you did.
![]()
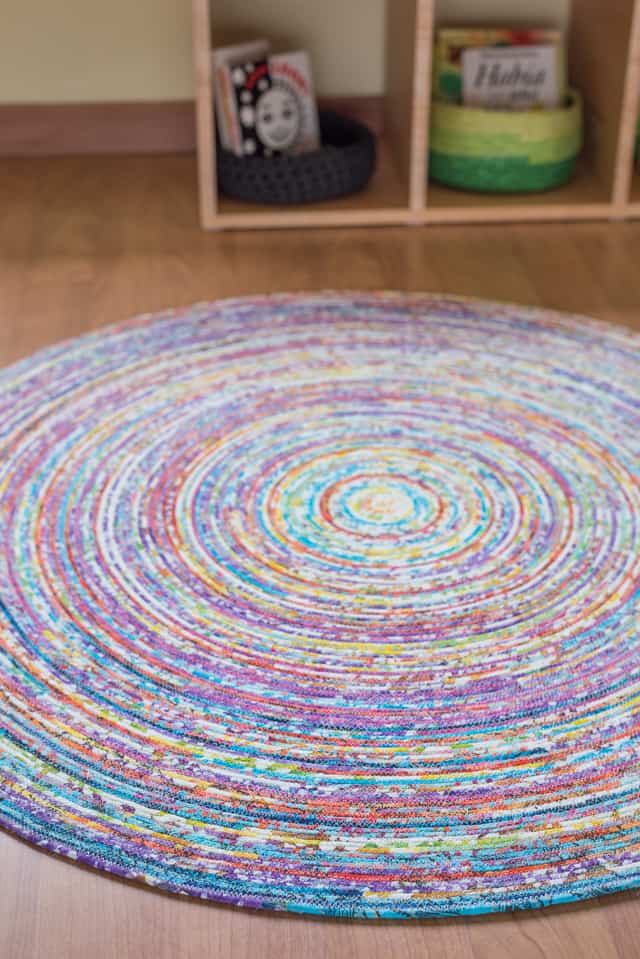
This is exactly the thought process I went though when I decided to make a rug earlier this fall. Looking at roughly equivalent products online and given the original cost of the fabrics I used to make the rug, there was no clear DIY cost benefit. Factoring in "labor costs" made DIY less cost effective. However, I purchased most of the fabrics two or more years ago and they've just been sitting in a drawer (many of the pieces were scraps that I couldn't actually use for anything but were "too big" to toss). I also happened to have about 1,000 feet of ⅛" cotton rope on hand. Most rugs I've seen other people make used slightly larger cord, but I like natural materials and, once again, already had the rope sitting around (also mostly unused for a couple of years). Since I didn't have to buy anything and had no other plans to use the materials necessary, I decided the theoretical higher DIY cost wasn't an issue.
Additionally, my husband and I agreed that making the rug would be a fun and meaningful project (he helped me by cutting approximately one zillion strips of fabric for the rug!). We have a strongly Montessori-influenced philosophy and intend to move Baby from a bassinet on the floor to a "floor bed" when the time is right without ever using a traditional crib. We wanted a rug to place under the bassinet/bed because we have wood floors and to help designate the area as belonging to Baby. Part of the Montessori philosophy involves recognizing even very young infants as unique individuals capable of so much more than we tend to give them credit for. Because Baby will not have a separate room, at least for the foreseeable future, we hope having a special rug will help us respect the space as an area belonging to another human being, not as a place to plop down a living doll. Although we certainly could have purchased a rug easily enough, part of the reason we decided to make one is so we'd have greater awareness of the rug and respect for the area. We're not going to accidentally tromp across the rug in dirty shoes after putting in so much sweat equity!
Yes, I know we're kind of weird, and we're totally okay with that.
Although there are many tutorials available for making your own coil rugs, I wanted to offer my own with a few tips and observations about the process.
Materials needed to make a rope & fabric coil rug
- LOTS of rope or cord. I used ⅛" cotton rope I'd previously purchased a spool of. You can use ⅜" or ¼" cording like the clothesline and sash cord you found at home improvement stores, and you can also use cording like you find by the yard at fabric stores. Large macramé cord could also work, too.
- The amount needed depends on the diameter of the cord and the size of your rug, but plan to use at least 600 feet. The clothesline-type cord typically comes in 200 foot hanks, so this isn't quite as bad as it sounds!
- Fabric - I highly recommend cotton. If you don't have a ton of fabric scraps, try checking out the remnants bin at your local fabric store for some bargains! I don't know exactly how much fabric I used in total, but probably 8-10 yards. With wider rope, you may use a bit less.
- A rotary cutting set. If you don't have a rotary cutter, you can make strips from cotton fabric by making a small cut and tearing the cloth.
- Sewing machine with a heavy duty needle and lots of thread.
- I used a cone of thread instead of spools!
- Use a sharp or universal needle that's either a 14/90 or a 16/100 (or even an 18/110!). Higher numbers equate to heavier duty needles - don't use a lightweight or 'normal' needle because it will break and frustrate you.
- I also have a "heavy duty" sewing machine. I love my Janome HD1000 and recommend it to anyone who's looking for a beginner-friendly workhorse machine.

Something no one tells you (at least not in the tutorials I looked at!) is that most of the time put into the rug is spent wrapping, wrapping, wrapping. I saw photos of people sewing giant rugs and thought "What a lot of sewing!" The sewing is easy and only takes about 1/10 of the time you'll put into the rug. And speaking of time: making a coil rug, particularly out of small diameter rope like what I used, will take hours and hours, most likely over the course of several days. The larger the rug, the longer it will take. That much is obvious, but because of the changing diameter, a 2" rug isn't twice as much work as a 1" rug - it's 4 times as much! A 4" rug is 4x as much again, and so on. I'm not trying to dissuade you from making your own coil rug, just provide you with an accurate view of the situation.
Time and quantity of materials aside, making your own coil rug is very, very easy. Because so much of the time is cutting fabric and wrapping it, you can easily listen to favorite music, podcasts, or audiobooks while you work. The sewing portion is so simple it doesn't matter if you 'barely know how to sew.' The trickiest part is dealing with the rug's bulk as it grows - you need to support at least most of the rug at the same height as your sewing machine as it gets bigger. To start with, stack thick books or thin boxes next to your sewing machine to keep everything at the same height. As you go along, setting up a side table or stool next to a larger table or counter is helpful. Don't allow the rug to simply hang off the edge of the machine unsupported or it will end up more like a large saucer than a rug!
To sew a rope & fabric coil rug
Cut lots of fabric strips. Lots and lots! You can also cut more as you go along, as needed. I cut strips ¾" wide, but you will want wider strips with wider rope. Cut a couple of trial sizes and play around with them before you begin sewing to see what width you prefer!

Select your widest zig-zag with a medium-length stitch. I used between a "2" and a "2.5," or roughly the midpoint of available stitch lengths for my machine. Feel free to play around with stitch length to see what you like best.
Set your tension low. At least on my machine, I needed the tension to be very low, as in only 1-2. Keep an eye on your stitches when you begin to make sure they look correct. If your stitch looks more like a stubby "Y" on the front than a "V," try lowering your tension.
Grab a fabric strip and wrap it around the beginning of your piece of rope, making sure you cover the raw end.
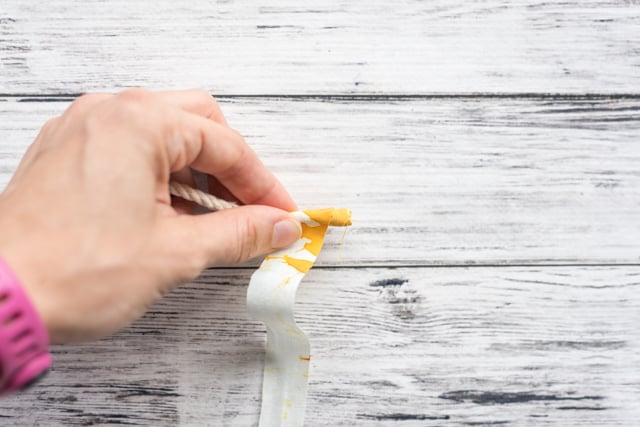
Play around with the wrapping angle so that you don't have gaps but also don't overlap too much on each pass. You can wrap "left" or "right." Just choose whichever feels more natural to you. Hold the wrapped fabric in place with your quilting clips.
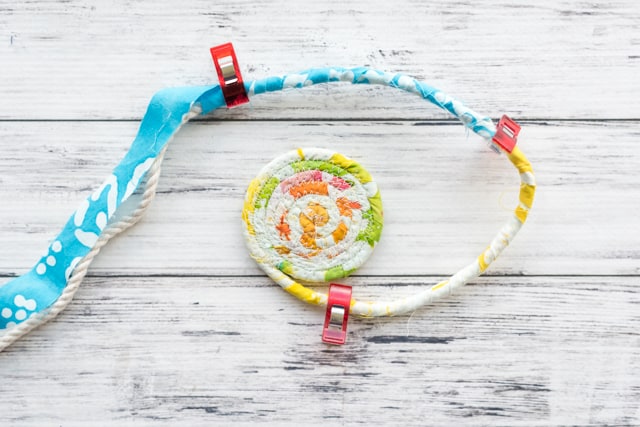
Fold the end over on itself and stitch in place, then begin your coil. Keep on coiling and stitching until you reach the end of your wrapped rope, then wrap some more and repeat! After I got the coil well-established I started securing the thread, removing the project from my machine, and then wrapped as much rope as I could based on my number of clips. You really only need a clip at the end of each piece of fabric or to hold everything in place if you take a break in the middle of a fabric strip.
Keep on keeping on! And on, and on...

I worked on this project a bit most days for almost two weeks before I finished it. If you're using a thicker rope (remember mine was a tiny ⅛"!) it will take you less time. A ¼" rope needs half as much sewing as a ⅛" rope does for a rug with the same diameter.
When you (finally!) get to the end, make sure you fold the fabric over your raw rope edge, stitch securely in place, and enjoy your new rug!
Additional tips & tricks for sewing a coil rug
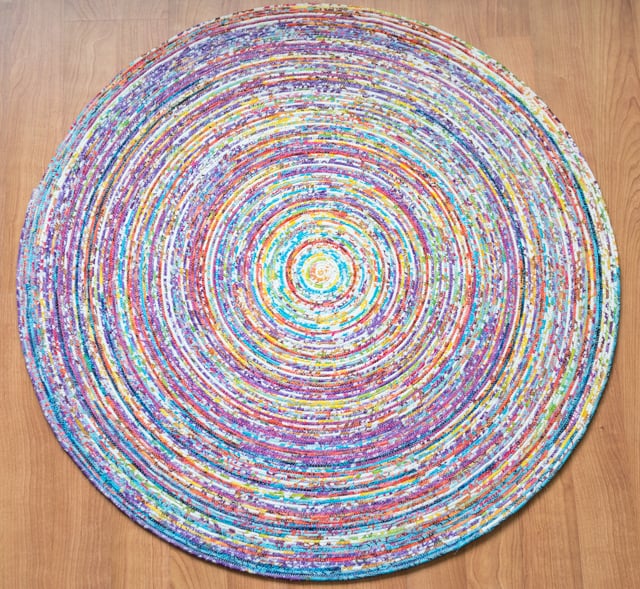
Roughly plan your rug's appearance before you begin. I used a rainbow of batik fabrics, but I wanted to incorporate all of my fabrics into the rug from the very beginning. You may want to use all or most of one particular fabric or color before moving on to a different fabric - it's entirely up to you. If you want a more "uniformly varied" appearance across the rug's width, go ahead and cut a whole of of your fabric at the beginning so you can pull all the different fabrics and colors in from the start.
If rethreading your machine is annoying, wind several bobbins at a time. I ended up using approximately on zillion bobbin's worth of thread! And by that I mean at least a dozen; I lost count.
As you go, you'll need to keep your ever-expanding rug at the same level as your sewing machine's sewing surface. Instead of trying to build up the height of my entire work surface, I ended up moving my sewing machine to a stool and I stacked cookbooks until it was the same height as my counter. This helps keep your rug from turning into a very large bowl instead of a flat rug.
If your rug starts to curl up on the edges, lay a towel down on the floor, place your rug on the towel, hit it with a steam iron, and press it under books. If it's still curling up, you'll probably want to go ahead and rip out the offending rows and stitch again. I had a huge, frustrating problem my rug bowing up for a while until I started feeding the rope into the machine with my right hand while managing the rug with my left. I basically "scrunched up" the rope as it was going in. Don't force so much extra in that the rope buckles out, but do compress it a little if you start to have trouble with your rug curling up. This happens because circumference of the circle on the 'left' side of the rope is actually slightly smaller than the diameter on the 'right' side of the rope, even when you're using something as thin as my ⅛" rope. The difference is so negligible early on that there aren't problems, but as the rug's diameter grows, the problem becomes more pronounced.
I'm sorry I don't have any particularly "good" photos of the completed rug. Because of how our apartment is arranged (and the yellow walls that make for very unattractive pictures) it was virtually impossible for me to get the entire rug in a shot. I like this photo, though, because you can see part of our baby shelf in the background!
I've been talking about this shelf for forever and still plan to share the project plans before too much longer. My brainstorming, planning, and writing posts for "maternity leave" process went a little too well and I've had so many projects to share that it's difficult to get them all on the schedule!
Have you ever made you own rug? And what questions do you ask yourself when deciding whether to buy or DIY something?
![]()
More Related Posts
[pt_view id=“15d429e15n"]
[catlist search="tutorial" numberposts=4 orderby=rand excludeposts=this]

Sarah
Your rug is beautiful! I would never have the patience for that I'm afraid.
Natasha
And here I am thinking I wouldn't have the patience to make your lovely layered mixed media pieces!